회원가입에 들어가기에 앞서…
main.ts 파일에
app.useGlobalPipes(new ValidationPipe());
위와 같은 구문을 추가해준다.
class-validator를 먹히게끔 만들어 줌.
회원가입 API 만들기
  @Post()
  async signUp(@Body() body) {
    console.log(body);
    return 'signup';
  }
위와 같이 만들었을 때,
{
    "email":"navskh@jinhakapply.com",
    "name":"blue",
    "password":"1105"
}
위와같은 데이터를 넘겨주면 잘 넘어오는 것을 확인할 수 있다.
이 때, email 데이터가 없다고 하면, 필수값 validate를 진행하여 주고 싶다.
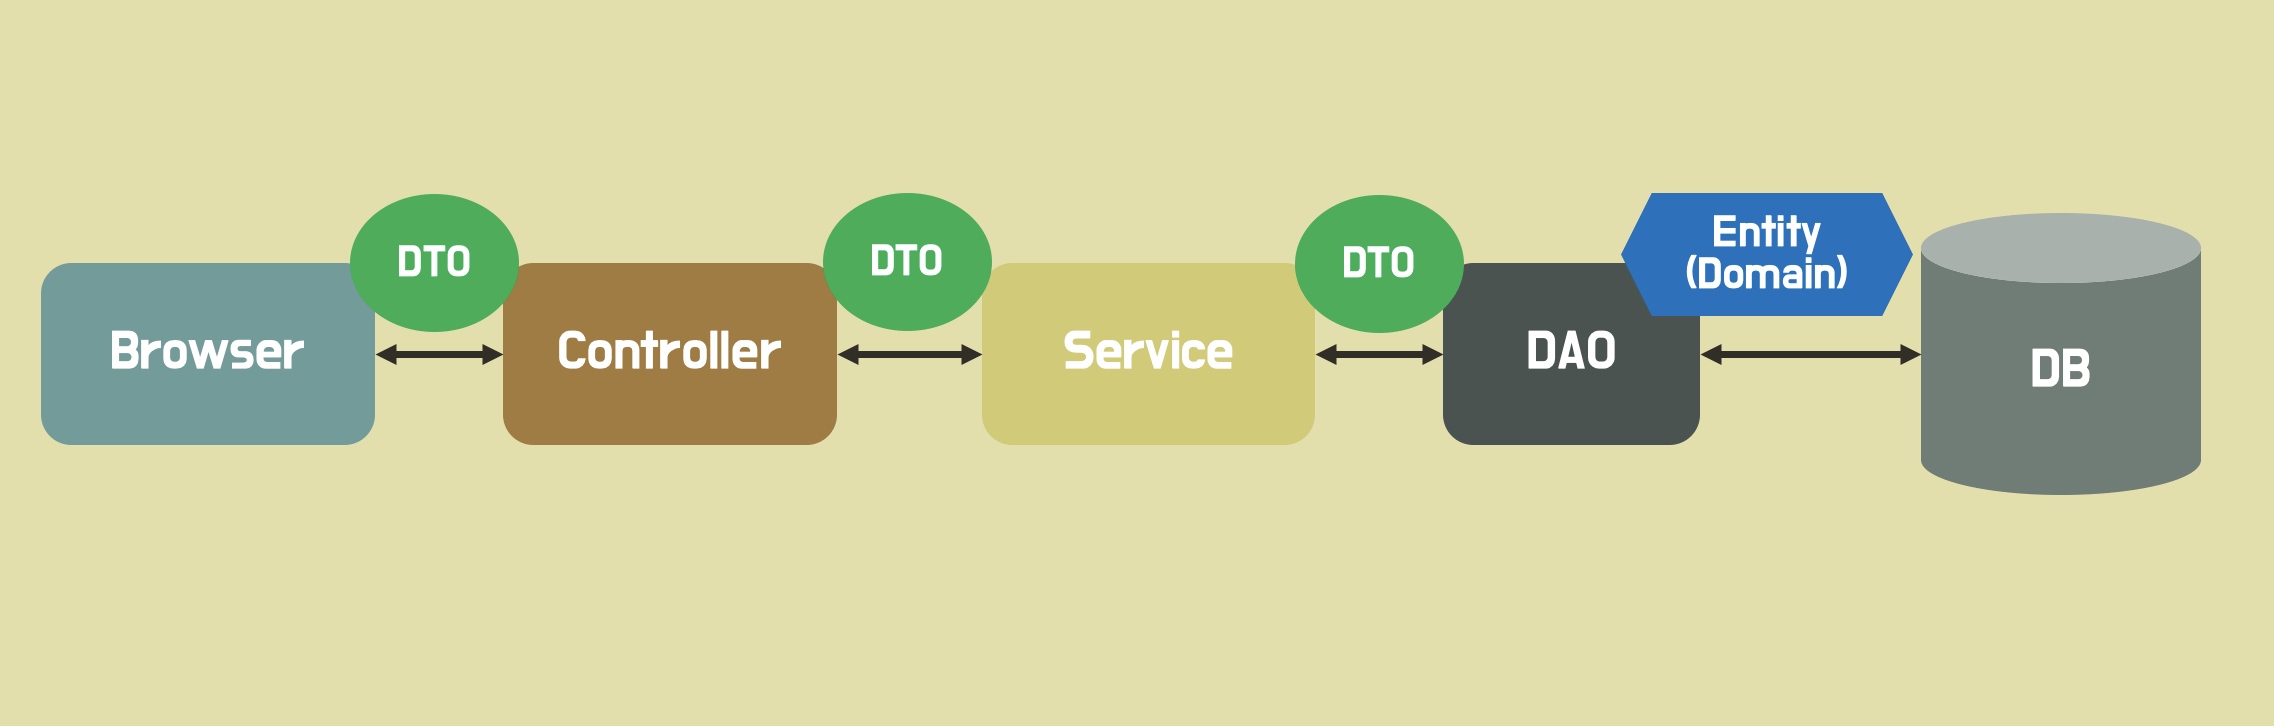
DTO (Data Transfer Object)
DB에서 데이터를 얻어 Service나 Controller로 보낼 때 사용하는 객체
/dto/cats.request.dto 라는 파일을 만들어 아래와 같이 작성한다.
import { IsEmail, IsNotEmpty, IsString } from 'class-validator';

export class CatRequestDto {
  @IsEmail()
  @IsNotEmpty()
  email: string;

  @IsString()
  @IsNotEmpty()
  password: string;

  @IsString()
  @IsNotEmpty()
  name: string;
}
위와 같이 조건들을 넣어주고
{
    "name":"blue",
    "password":"1105"
}
위와 같이 데이터에 mail 정보를 없애면
{
    "success": false,
    "timestamp": "2022-12-25T23:59:34.849Z",
    "statusCode": 400,
    "message": [
        "email should not be empty",
        "email must be an email"
    ],
    "error": "Bad Request"
}
위와 같이 false 값이 return 되는 것을 알 수 있다.
Controller 와 Service 연결하기
@Post()
async signUp(@Body() body: CatRequestDto) {
  return this.catsService.signUp(body);
}
controller 에서 위와 같이 작성해주고
import { Injectable } from '@nestjs/common';
import { CatRequestDto } from './dto/cats.request.dto';

@Injectable()
export class CatsService {
  signUp(body: CatRequestDto) {}
}
service를 위와 같이 작성한다.
그리고 module 에서 스키마 등록하기
imports: [MongooseModule.forFeature([{name: Cat.name, schema: CatSchema}])],
1. 이메일 중복 체크
if (isCatExist) {
  throw new UnauthorizedException('해당하는 고양이는 이미 존재합니다.');
}
2. 이메일 중복 체크
const hashedPassword = await bcrypt.hash(password, 10);
3. create 시키기
const cat = await this.catModel.create({
  email,
  name,
  password: hashedPassword,
});

return cat;
위와 같이 코딩하여 요청을 보내면
{
    "success": true,
    "data": {
        "email": "navskh@naver.com",
        "name": "blue",
        "password": "$2b$10$/xX8SGuDytdX5c2/mRJKte5U4gZbUPta/hQnFgN.1A7ocDEZX5XGq",
        "_id": "63a90adc50cf828046c7266e",
        "createdAt": "2022-12-26T02:45:48.596Z",
        "updatedAt": "2022-12-26T02:45:48.596Z",
        "__v": 0
    }
}
위와 같은 응답이 오게 되고 mongoDB에서 확인하면 잘 들어간 것을 확인할 수 있다.
음… 어디서 insert가 되는건지를 아직도 이해를 못하겠는데 아마 Post 요청을 읽으면 알아서 insert가 되는건지 좀더 봐야할 것 같다..
그리고 schema 에서
const options: SchemaOptions = {
  timestamps: true,
};
이렇게 option 으로 선택해주니 위의 createdAt, updatedAt 을 자동으로 만들어주는 것을 알 수 있다.
또한 같은 이메일로 요청을 보내면
{
    "success": false,
    "timestamp": "2022-12-26T02:57:05.223Z",
    "statusCode": 401,
    "message": "해당하는 고양이는 이미 존재합니다.",
    "error": "Unauthorized"
}
위와 같이 validation error가 나오는 것을 알 수 있다.
password 숨기기
cats.schema.ts 파일에
CatSchema.virtual('readOnlyData').get(function (this: Cat) {
  return {
    id: this.id,
    email: this.email,
    name: this.name
  }
})
readonly readOnlyData: { id: string; email: string; name: string };
위와 같이 readOnlyData라는 virtual 객체를 만들어주고
return 할 때 cat.readOnlyData 를 넣어준다.
그러면 해당 요청에 대해서 응답으로
{
    "success": true,
    "data": {
        "id": "63a90eb2a37c52a7a532cfc4",
        "email": "sad@naver.com",
        "name": "blue"
    }
}
password를 안 보내주는 것을 확인할 수 있다.